Sorting in EnScript – Sorting Arrays and NameListClass / NameValueClass

Every language has its own quirks when it comes to sorting data. In this post, I’ll take an introductory look at some of the most basic methods available for sorting data in EnScript. First, we need a list of some type of data that we want to sort. Our first example is going to use the ulong type, which, in EnScript, is a 64-bit unsigned integer. You might use a ulong if you were storing a list of file sizes, such as those presented by EntryClass::LogicalSize().

We’re going to declare a ulong array type by using the typedef statement as seen in line 3 below. On line 18, we’ll create our array with five values. One of the nicest things about arrays in EnScript is that they have a built-in Sort function, and it takes options from the built-in class ArrayClass. Lines 22, 25, and 28 demonstrate the differences in those options. Using ArrayClass::SORTENABLED performs a default sort of the array in ascending order (smallest to largest). Adding ArrayClass::SORTDESCENDING sorts in descending order (largest to smallest). Finally, adding ArrayClass::SORTNODUPE removes duplicates from the array. This could be useful if you were trying to generate a list of unique values. Take a look through the example below and then check out the output section below it.

ulong Example:

class MainClass {

  typedef ulong[] ulongArray;

  void printArray(ulongArray array) {
    ulong curr;
    forall (ulong u in array) {
      Console.Write(u);
      if (++curr < array.Count()) {
        Console.Write("\t");
      }
    }
    Console.Write("\n");
  }

  void Main() {
    SystemClass::ClearConsole();
    ulongArray array {548, 23, 164, 87, 164};
    //Original order
    printArray(array);
    //Sort ascending
    array.Sort(ArrayClass::SORTENABLED);
    printArray(array);
    //Sort descending
    array.Sort(ArrayClass::SORTENABLED | ArrayClass::SORTDESCENDING);
    printArray(array);
    //Sort ascending, remove duplicates
    array.Sort(ArrayClass::SORTENABLED | ArrayClass::SORTNODUPE);
    printArray(array);
  }
}

Output:

548	23	164	87	164
23	87	164	164	548
548	164	164	87	23
23	87	164	548

Take a look at the output of our code above. Are the results as you expected them? The first line contains the original list in its original order. The second line shows the list after it has been sorted in ascending order, the third after a descending order sort, and the fourth shows the list in ascending order after duplicates have been removed. Pretty straightforward, right? The options are the same for sorting other numerical types of arrays, such as int, char, and even DateClass.

Next let’s take a look at sorting a String array. When you’re dealing with everything in the same case, the options will look much the same as they did above. You’ll note that I threw in a different length string just so you can see how it’s sorted. Scroll down to see the output.

String Example:

class MainClass {

  typedef String[] StringArray;

  void printArray(StringArray array) {
    ulong curr;
    forall (String s in array) {
      Console.Write(s);
      if (++curr < array.Count()) {
        Console.Write("\t");
      }
    }
    Console.Write("\n");
  }

  void Main() {
    SystemClass::ClearConsole();
    StringArray array {"abc", "abb", "aab", "aacd"};
    //Original order
    printArray(array);
    //Sort ascending
    array.Sort(ArrayClass::SORTENABLED);
    printArray(array);
    //Sort descending
    array.Sort(ArrayClass::SORTENABLED | ArrayClass::SORTDESCENDING);
    printArray(array);
  }
}

Output:

abc	abb	aab	aacd
aab	aacd	abb	abc
abc	abb	aacd	aab

You’ll see that it sorts on the first letter, then moves on and sorts on the second letter, and so on. You can see that even though "aacd" is a longer string than "abb" and "abc", it is sorted before them, because the first and second letters "aa" come before "ab" of the latter two strings.

So what happens when we have mixed case strings? You can see on line 19 that all of the array members have the letters "abc" in various mixed case. On line 23 we’re doing a standard ascending sort just like before. On line 26, however, we see a new option: ArrayClass::SORTCASE. This option will turn on case sensitive sorting for strings. You can see its effect in the output below our code.

String Case Sensitive Example:

class MainClass {

  typedef String[] StringArray;

  void printArray(StringArray array) {
    ulong curr;
    forall (String s in array) {
      Console.Write(s);
      if (++curr < array.Count()) {
        Console.Write("\t");
      }
    }
    Console.Write("\n");
  }

  void Main() {
    SystemClass::ClearConsole();
    //Create a new array with mixed case
    StringArray array {"abc", "Abc", "aBC", "abC", "ABc", "AbC"};
    //Original order
    printArray(array);
    //Sort default - case insensitive
    array.Sort(ArrayClass::SORTENABLED);
    printArray(array);
    //Sort case sensitive
    array.Sort(ArrayClass::SORTENABLED | ArrayClass::SORTCASE);
    printArray(array);
  }
}

Output:

abc	Abc	aBC	abC	ABc	AbC
Abc	aBC	abC	ABc	AbC	abc
ABc	AbC	Abc	aBC	abC	abc	

As usual, the first line shows the original order. The second line shows a case insensitive sort – if you converted all of the strings to lowercase, this is the sort you would get. The third line shows our new option – the case sensitive sort. You’ll quickly notice that the first three strings start with a capital "A" and the last three start with a lowercase "a".

The last basic sorting functionality I’ll show you is for NameListClass and NameValueClass. Both of these types inherit from NodeClass, and thus can take advantage of the NodeClass::INSERTSORTED option when inserting a new node. You can see on lines 11 through 16 that we’ve used this option when inserting our NameValueClass objects. This uses an extra line of code for each new object we insert into the list, but it allows us to perform a sorted insert instead of just the order we come upon the values. Both NameListClass and NameValueClass will be sorted on the string value of the Name() property.

NameListClass and NameValueClass Example:

class MainClass {
  void Main() {
    SystemClass::ClearConsole();
    NameValueClass stringList();
    NameValueClass foo1(null, "abc", 0, "foo1");
    NameValueClass bar(null, "abb", 0, "bar");
    NameValueClass foo2(null, "abc", 0, "foo2");
    NameValueClass baz(null, "aab", 0, "baz");
    NameValueClass qux(null, "aac", 0, "qux");
    NameValueClass foo3(null, "abc", 0, "foo3");
    stringList.Insert(foo1, NodeClass::INSERTSORTED);
    stringList.Insert(bar, NodeClass::INSERTSORTED);
    stringList.Insert(foo2, NodeClass::INSERTSORTED);
    stringList.Insert(baz, NodeClass::INSERTSORTED);
    stringList.Insert(qux, NodeClass::INSERTSORTED);
    stringList.Insert(foo3, NodeClass::INSERTSORTED);
    forall (NameValueClass n in stringList) {
      Console.WriteLine(n.Name() + "(" + n.Value() + ")");
    }
  }
}

Output:

aab(baz)
aac(qux)
abb(bar)
abc(foo3)
abc(foo2)
abc(foo1)

You can see that this works in the same manner that our string sort example did. It’s very interesting to note, however, the order that the items with the same value for Name() (foo1, foo2, and foo3) were sorted in. That is – they are sorted in reverse of the order in which they were inserted. The nodes are being inserted just before their value equivalents in the list. I actually find this quite annoying, though as long as we know the behavior we can work around it.

By now you should have a good understanding of the basics of sorting lists in EnScript. In the next post, I’ll show you how to sort arrays of user-defined class objects, and we’ll do some performance tests to see how the built-in array sorting algorithms hold up with large lists.

Haruyama’s New Addition to My Timeline EnScript – FileName Attribute Parsing

Takahiro Haruyama, who is well known for bringing the power of Volatility to EnScript land, made a great revision to my Timeline EnScript by adding MFT FileName Attribute parsing to it! He’s published the update on his blog. This really makes the script much more versatile and I think forensics practitioners will love the update. Right now the script only outputs the info to the HTML view, but over the next few weeks I’ll try to find some time to push it into all the output formats and give everyone an update. Great work Haruyama, thanks for adding this much needed functionality!

Creating a COM Accessible DLL in Visual C# for EnScript

A while back, I came across a thread on the EnCase EnScript forum asking for assistance in getting EnScript to recognize the interfaces for a DLL created in C#.Net through COM. I created a self-contained C# demo project to help out. The original code can be browsed on github for branch “v0.1”. This post is an update to the information in that thread with extra references and an update on 64-bit OS usage. I recently updated the code which, as of this posting, can be found on github for branch “v0.2” or on the EnScripts page of the website. If you’re still interested, please download the code and follow along. If you’re a glutton for punishment, feel free to read all the links in their full MSDN glory.

In the scenario, the same DLL would work just fine when accessing its methods and properties through VBScript, but EnScript wouldn’t “see” any of them. This wasn’t so much an EnScript or, necessarily, a .NET problem. It’s actually an issue with the early binding that EnCase requires in combination with the lack of registration on the part of .NET.

Making the Code Work:
There are, however, a few things to take care of in the code before worrying about registration. Your interface should be set to InterfaceIsDual, your class interface type can be set to None, and you should set ComVisible to true on both of them. In the code below, you would replace InterfaceGUID and ClassGUID with your own previously generated GUID values. If you’ve worked with Visual Studio for any length of time, you’ll soon discover that you should generate your own GUIDs ahead of time using guidgen.exe and manually assign them, otherwise Visual Studio will create new GUIDs every time you run Regasm.exe (which is annoying). The below code can be found in the demo in CDemo.cs.


[Guid("InterfaceGUID"), InterfaceType(ComInterfaceType.InterfaceIsDual)]
[ComVisible(true)]
public interface _COMDemo
{
...
}
[Guid("ClassGUID"), ClassInterface(ClassInterfaceType.None)]
[ComVisible(true)]
public class COMDemo : _COMDemo
{
...

Before we get any further, I should also mention in passing that it’s always best to use Strong-Named Assemblies.

After your code is all set, we need to deal with the registration issues. The first thing we need to do is register our DLL in the Global Assembly Cache using Gacutil.exe or a capable installer:

gacutil.exe /i CDemoLib.dll /f

Next, we’ll register the assembly for COM access using Regasm.exe:

regasm.exe CDemoLib.dll /tlb:CDemoLib.tlb

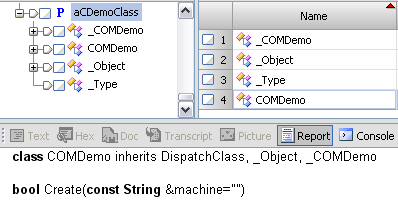
Creating the TypeLib using Regasm.exe generates a default interface with no methods. VBScript makes only late-bound calls into the assembly; it doesn’t use the TypeLib so it doesn’t care that the default interface is empty. Here’s what that gets us:

Regasm.exe also fails to add all of the keys in the registry that are required for early-binders and these can be hard to track down. Take a look at the keys that are missing below.

Windows Registry Editor Version 5.00
[HKEY_CLASSES_ROOT\CLSID\{ClassGUID}\Control]
[HKEY_CLASSES_ROOT\CLSID\{ClassGUID}\MiscStatus]
@="131457"
[HKEY_CLASSES_ROOT\CLSID\{ClassGUID}\Typelib]
@="{TypelibGUID}"
[HKEY_CLASSES_ROOT\CLSID\{ClassGUID}\Version]
@="1.0"

HKEY_CLASSES_ROOT is an alias for HKEY_LOCAL_MACHINE\SOFTWARE\Classes. These keys are essential for the methods and properties to be COM accessible to early-binders. The Control key identifies our object as an ActiveX control. The MiscStatus key takes its values from the OLEMISC enumeration. The Typelib key points to the GUID of the Typelib, which is the GuidAttribute of the assembly (found in AssemblyInfo.cs). And Version is pretty straightforward. This article mostly applies, despite its age. After adding our custom entries:

After you’ve thrown in all the extras, you should be ready to go with EnScript! Fire up EnCase and take a look at the sample EnScript that’s included with the code. The first thing you’ll notice at the top is the typelib instruction.

typelib aCDemoClass "CDemoLib.COMDemo"

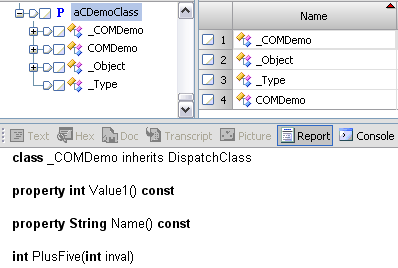
This tells EnCase to retrieve the CLSID for the assembly from HKEY_CLASSES_ROOT\CDemoLib.COMDemo\CLSID, then locate the CLSID at HKEY_CLASSES_ROOT\CLSID\{ClassGUID} and import the TypeLib specified. If we got everything right, you should see this in the EnScript Types tab of EnCase:

Magic!

You can see the properties and methods are showing up just fine. Next we’re going to declare our variable using the newly imported class and call Create() to instantiate the object.

aCDemoClass::COMDemo acd;
...
acd.Create();

That’s it! You can see from the demo code that we can set and retrieve the values of our properties:

Console.WriteLine("Value1: " + acd.Value1());
...
acd.SetValue1(1000);
...
Console.WriteLine("Value1: " + acd.Value1());

Output:
Value1: 0
Value1: 1000

And we can also utilize the methods from our DLL:

Console.WriteLine("acd.PlusFive(7): " + acd.PlusFive(7));

Output: “acd.PlusFive(7): 12

64-bit
Recently an acquaintance was having issues with getting the project to work in a 64-bit OS, so I updated the example registration files for version 0.2. The only real difference is that you run the 64-bit version of Regasm.exe from the Framework64 directory. This inserts the necessary info for use with the 64-bit version of EnCase. The same registry keys we inserted above still apply because Windows aliases the proper section of the registry for 64-bit usage. The latest version of the code updates the project to Visual Studio 2010 and I’ve confirmed testing for .NET Framework versions 2 and 4 with the new project.

Got Errors?
If you forgot to perform any registration at all, you’ll probably see, “Expecting ‘field or method declaration’, Custom dotNet COM Object(13,13).”

Depending on the version of Regasm.exe used, if you don’t add the custom registry keys, when you run the script you might see a “Class not registered” error or something similar.

Anything I missed? Drop me a line in the comments.

GitHub is Pretty Swell!

I’m slowing starting to move all my current code over to GitHub. GitHub is an online collaboration environment for use with Git, a fast, distributed version control system. It’s used by some pretty heavy hitters in the development world. On Windows, I use PortableGit because it’s easy and self-contained; on Ubuntu, Git can be found in apt/Synaptic.

You’ll see a new link in my menu at the top pointing to my public GitHub repositories. From here you can browse the code or download entire projects. For the meantime I’ll keep posting zip files to the EnSCripts page as they’re often easier for non-developers to deal with. Consider learning Git and moving your own projects to GitHub if you’re still self-hosting. Just, uh, don’t commit passwords. Enjoy!